Hexo
Hexo 是一个快速、简洁且高效的博客框架。
安装
安装 Git:
安装 node.js:
安装 Hexo:-g 表示全局安装,会将 Hexo 命令加入环境变量中。
$ npm --registry https://registry.npm.taobao.org install -g hexo-cli
# 持久使用镜像
$ npm config set registry https://registry.npm.taobao.org
Where do global npm packages get installed
$ npm root -g
建站
$ hexo init [folder]
$ cd <folder>
$ npm install
新建完成后,指定文件夹的目录如下:
.
├── node_modules		//依赖安装目录
├── scaffolds			//模板文件夹,Hexo的模板是指在新建的文章文件中默认填充的内容。
|   ├── draft.md		//草稿模板
|   ├── page.md			//页面模板
|   └── post.md			//文章模板
├── source				//资源文件夹
|   └── _posts			//文章目录
├── themes				//主题文件夹,Hexo 会根据主题来生成静态页面。
|   └── landscape		//默认主题
├── .gitignore			//指定不纳入git版本控制的文件
├── _config.yml			//站点配置文件
├── db.json
├── package.json		//应用程序的信息
└── package-lock.json
source:资源文件夹是存放用户资源的地方。除 _posts 文件夹之外,开头命名为 _ (下划线)的文件 / 文件夹和隐藏的文件将会被忽略。
配置
您可以在 _config.yml 中修改大部分的配置。
网站
| 参数 | 描述 |
|---|---|
title | 网站标题 |
subtitle | 网站副标题 |
description | 网站描述 |
keywords | 网站的关键词。支持多个关键词。 |
author | 您的名字 |
language | 网站使用的语言。对于简体中文用户来说,使用不同的主题可能需要设置成不同的值,请参考你的主题的文档自行设置,常见的有 zh-Hans和 zh-CN。 |
timezone | 网站时区。Hexo 默认使用您电脑的时区。请参考 时区列表 进行设置,如 America/New_York, Japan, 和 UTC 。一般的,对于中国大陆地区可以使用 Asia/Shanghai。 |
其中,description主要用于SEO,告诉搜索引擎一个关于您站点的简单描述,通常建议在其中包含您网站的关键词。author参数用于主题显示文章的作者。
网址
| 参数 | 描述 | 默认值 |
|---|---|---|
url | 网址, 必须以 http:// 或 https:// 开头 | |
root | 网站根目录 | url's pathname |
permalink | 文章的 永久链接 格式 | :year/:month/:day/:title/ |
permalink_defaults | 永久链接中各部分的默认值 | |
pretty_urls | 改写 permalink 的值来美化 URL | |
pretty_urls.trailing_index | 是否在永久链接中保留尾部的 index.html,设置为 false 时去除 | true |
pretty_urls.trailing_html | 是否在永久链接中保留尾部的 .html, 设置为 false 时去除 (对尾部的 index.html无效) | true |
网站存放在子目录
如果您的网站存放在子目录中,例如
http://example.com/blog,则请将您的url设为http://example.com/blog并把root设为/blog/。
例如:
# 比如,一个页面的永久链接是 http://example.com/foo/bar/index.html
pretty_urls:
  trailing_index: false
# 此时页面的永久链接会变为 http://example.com/foo/bar/
目录
| 参数 | 描述 | 默认值 |
|---|---|---|
source_dir | 资源文件夹,这个文件夹用来存放内容。 | source |
public_dir | 公共文件夹,这个文件夹用于存放生成的站点文件。 | public |
tag_dir | 标签文件夹 | tags |
archive_dir | 归档文件夹 | archives |
category_dir | 分类文件夹 | categories |
code_dir | Include code 文件夹,source_dir 下的子目录 | downloads/code |
i18n_dir | 国际化(i18n)文件夹 | :lang |
skip_render | 跳过指定文件的渲染。匹配到的文件将会被不做改动地复制到 public 目录中。您可使用 glob 表达式来匹配路径。 |
例如:
skip_render: "mypage/**/*"
# 将会直接将 `source/mypage/index.html` 和 `source/mypage/code.js` 不做改动地输出到 'public' 目录
# 你也可以用这种方法来跳过对指定文章文件的渲染
skip_render: "_posts/test-post.md"
# 这将会忽略对 'test-post.md' 的渲染
提示
如果您刚刚开始接触 Hexo,通常没有必要修改这一部分的值。
文章
| 参数 | 描述 | 默认值 |
|---|---|---|
new_post_name | 新文章的文件名称 | :title.md |
default_layout | 预设布局 | post |
auto_spacing | 在中文和英文之间加入空格 | false |
titlecase | 把标题转换为 title case | false |
external_link | 在新标签中打开链接 | true |
external_link.enable | 在新标签中打开链接 | true |
external_link.field | 对整个网站(site)生效或仅对文章(post)生效 | site |
external_link.exclude | 需要排除的域名。主域名和子域名如 www 需分别配置 | [] |
filename_case | 把文件名称转换为 (1) 小写或 (2) 大写 | 0 |
render_drafts | 显示草稿 | false |
post_asset_folder | 启动 Asset 文件夹 | false |
relative_link | 把链接改为与根目录的相对位址 | false |
future | 显示未来的文章 | true |
highlight | 代码块的设置, 请参考 Highlight.js 进行设置 | |
prismjs | 代码块的设置, 请参考 PrismJS 进行设置 |
相对地址
默认情况下,Hexo 生成的超链接都是绝对地址。例如,如果您的网站域名为
example.com,您有一篇文章名为hello,那么绝对链接可能像这样:http://example.com/hello.html,它是绝对于域名的。相对链接像这样:/hello.html,也就是说,无论用什么域名访问该站点,都没有关系,这在进行反向代理时可能用到。通常情况下,建议使用绝对地址。
分类 & 标签
| 参数 | 描述 | 默认值 |
|---|---|---|
default_category | 默认分类 | uncategorized |
category_map | 分类别名 | |
tag_map | 标签别名 |
日期 / 时间格式
Hexo 使用 Moment.js 来解析和显示时间。
| 参数 | 描述 | 默认值 |
|---|---|---|
date_format | 日期格式 | YYYY-MM-DD |
time_format | 时间格式 | HH:mm:ss |
updated_option | 当 Front Matter 中没有指定 updated 时 updated 的取值 | mtime |
updated_option
updated_option控制了当 Front Matter 中没有指定updated时,updated如何取值:
mtime: 使用文件的最后修改时间。这是从 Hexo 3.0.0 开始的默认行为。date: 使用date作为updated的值。可被用于 Git 工作流之中,因为使用 Git 管理站点时,文件的最后修改日期常常会发生改变empty: 直接删除updated。使用这一选项可能会导致大部分主题和插件无法正常工作。
use_date_for_updated选项已经被废弃,将会在下个重大版本发布时去除。请改为使用updated_option: 'date'。
use_date_for_updated` | 启用以后,如果 Front Matter 中没有指定 `updated`, [`post.updated`](https://hexo.io/zh-cn/docs/configuration) 将会使用 `date` 的值而不是文件的创建时间。在 Git 工作流中这个选项会很有用 | `true
分页
| 参数 | 描述 | 默认值 |
|---|---|---|
per_page | 每页显示的文章量 (0 = 关闭分页功能) | 10 |
pagination_dir | 分页目录 | page |
扩展
| 参数 | 描述 |
|---|---|
theme | 当前主题名称。值为false时禁用主题 |
theme_config | 主题的配置文件。在这里放置的配置会覆盖主题目录下的 _config.yml 中的配置 |
deploy | 部署部分的设置 |
meta_generator | Meta generator 标签。 值为 false 时 Hexo 不会在头部插入该标签 |
包括或不包括目录和文件
在 Hexo 配置文件中,通过设置 include/exclude 可以让 Hexo 进行处理或忽略某些目录和文件夹。你可以使用 glob 表达式 对目录和文件进行匹配。
include and exclude options only apply to the source/ folder, whereas ignore option applies to all folders.
| 参数 | 描述 |
|---|---|
include | Hexo 默认会忽略隐藏文件和文件夹(包括名称以下划线和 . 开头的文件和文件夹,Hexo 的 _posts 和 _data 等目录除外)。通过设置此字段将使 Hexo 处理他们并将它们复制到 source 目录下。 |
exclude | Hexo 会忽略这些文件和目录 |
ignore | Ignore files/folders |
举例:
# Include/Exclude Files/Folders
include:
  - ".nojekyll"
  # 包括 'source/css/_typing.css'
  - "css/_typing.css"
  # 包括 'source/_css/' 中的任何文件,但不包括子目录及其其中的文件。
  - "_css/*"
  # 包含 'source/_css/' 中的任何文件和子目录下的任何文件
  - "_css/**/*"

exclude:
  # 不包括 'source/js/test.js'
  - "js/test.js"
  # 不包括 'source/js/' 中的文件、但包括子目录下的所有目录和文件
  - "js/*"
  # 不包括 'source/js/' 中的文件和子目录下的任何文件
  - "js/**/*"
  # 不包括 'source/js/' 目录下的所有文件名以 'test' 开头的文件,但包括其它文件和子目录下的单文件
  - "js/test*"
  # 不包括 'source/js/' 及其子目录中任何以 'test' 开头的文件
  - "js/**/test*"
  # 不要用 exclude 来忽略 'source/_posts/' 中的文件。你应该使用 'skip_render',或者在要忽略的文件的文件名之前加一个下划线 '_'
  # 在这里配置一个 - "_posts/hello-world.md" 是没有用的。

ignore:
  # Ignore any folder named 'foo'.
  - "**/foo"
  # Ignore 'foo' folder in 'themes/' only.
  - "**/themes/*/foo"
  # Same as above, but applies to every subfolders of 'themes/'.
  - "**/themes/**/foo"
列表中的每一项都必须用单引号或双引号包裹起来。
include 和 exclude 并不适用于 themes/ 目录下的文件。如果需要忽略 themes/ 目录下的部分文件或文件夹,可以使用 ignore 或在文件名之前添加下划线 _。
使用代替配置文件
可以在 hexo-cli 中使用 --config 参数来指定自定义配置文件的路径。你可以使用一个 YAML 或 JSON 文件的路径,也可以使用逗号分隔(无空格)的多个 YAML 或 JSON 文件的路径。例如:
# use 'custom.yml' in place of '_config.yml'
$ hexo server --config custom.yml

# use 'custom.yml' & 'custom2.json', prioritizing 'custom3.yml', then 'custom2.json'
$ hexo generate --config custom.yml,custom2.json,custom3.yml
当你指定了多个配置文件以后,Hexo 会按顺序将这部分配置文件合并成一个 _multiconfig.yml。如果遇到重复的配置,排在后面的文件的配置会覆盖排在前面的文件的配置。这个原则适用于任意数量、任意深度的 YAML 和 JSON 文件。
例如,使用 --options 指定了两个自定义配置文件:
$ hexo generate --config custom.yml,custom2.json
如果 custom.yml 中指定了 foo: bar,在 custom2.json 中指定了 "foo": "dinosaur",那么在 _multiconfig.yml 中你会得到 foo: dinosaur。
使用代替主题配置文件
通常情况下,Hexo 主题是一个独立的项目,并拥有一个独立的 _config.yml 配置文件。
除了自行维护独立的主题配置文件,你也可以在其它地方对主题进行配置。
配置文件中的 theme_config
该特性自 Hexo 2.8.2 起提供
# _config.yml
theme: "my-theme"
theme_config:
  bio: "My awesome bio"
  foo:
    bar: 'a'
# themes/my-theme/_config.yml
bio: "Some generic bio"
logo: "a-cool-image.png"
  foo:
    baz: 'b'
最终主题配置的输出是:
{
  bio: "My awesome bio",
  logo: "a-cool-image.png",
  foo: {
    bar: "a",
    baz: "b"
  }
}
独立的 _config.[theme].yml 文件
该特性自 Hexo 5.0.0 起提供
独立的主题配置文件应放置于站点根目录下,支持 yml 或 json 格式。需要配置站点 _config.yml 文件中的 theme 以供 Hexo 寻找 _config.[theme].yml 文件。
# _config.yml
theme: "my-theme"
# _config.my-theme.yml
bio: "My awesome bio"
foo:
  bar: 'a'
# themes/my-theme/_config.yml
bio: "Some generic bio"
logo: "a-cool-image.png"
  foo:
    baz: 'b'
最终主题配置的输出是:
{
  bio: "My awesome bio",
  logo: "a-cool-image.png",
  foo: {
    bar: "a",
    baz: "b"
  }
}
我们强烈建议你将所有的主题配置集中在一处。如果你不得不在多处配置你的主题,那么这些信息对你将会非常有用:Hexo 在合并主题配置时,Hexo 配置文件中的
theme_config的优先级最高,其次是_config.[theme].yml文件,最后是位于主题目录下的_config.yml文件。
指令
version 显示 Hexo 版本:
hexo versionlist 列出网站资料:
hexo list新建一篇文章:如果没有设置 layout 的话,默认使用 _config.yml 中的 default_layout 参数代替。如果标题包含空格的话,请使用引号括起来。
hexo new [layout] <title>
hexo n [layout] <title>
Hexo 有三种默认布局:
布局 路径 post source/_posts page source draft source/_drafts 预览草稿,publish 发表草稿:
hexo server --draft
hexo publish [layout] <filename>
clean 清除缓存文件 (db.json) 和已生成的静态文件 (public):
hexo cleangenerate 生成静态文件:
hexo generate
hexo g
启动 hexo 的内置 Web 服务器:该命令将会调用 Markdown 引擎解析项目中的博客内容生成网页资源,资源将会存于内存中。
hexo server
hexo s --debug		# 开启调试模式(--debug)
hexo s --port 8000	# 添加 -p / --port 参数来设置 Web 服务监听的端口号
hexo s --static		# 加 -s / --static 参数,本地改动不触发 hexo 实时解析更新。
deploy 部署网站:
hexo deploy
hexo d
写作
Front-matter: 是文件最上方以
---分隔的区域,用于指定个别文件的变量--- layout: # 布局 title: # 标题 date: # 建立日期 updated: # 更新日期 comments: # 开启文章的评论功能 tags: # 标签 - 标签1 - 标签2 categories: [分类1, 分类2] # 分类, 不适用与分页 permalink: # 覆盖文章网址 ---标签是一种列表结构,而分类是一种树结构。
文本居中标签:在引用单行文本时使用
<blockquote class="blockquote-center">blah blah blah</blockquote>		# HTML方式

{% centerquote %}blah blah blah{% endcenterquote %}		# 标签方式

{% cq %} blah blah blah {% endcq %}		# 标签别名
引用块
{% blockquote [author[, source]] [link] [source_link_title] %}
content
{% endblockquote %}
代码块
``` [language] [title] [url] [link text]
code snippet
- `langugae`:语言名称,引导渲染引擎正确解析并高亮显示关键字 - `title`:代码块标题,将会显示在左上角 - `url`:链接地址,如果没有指定 link text 则会在右上角显示 link - `link text`:链接名称,指定 url 后有效,将会显示在右上角 - 如果设置语言为 diff,可以在代码前添加 `+` 和 `-` 来使用如上所示的高亮增删行提示效果,在展示代码改动痕迹时比较实用。note 标签:通过 note 标签可以为段落添加背景色
{% note [class] %} 文本内容 (支持行内标签) {% endnote %}- 支持的 class 种类包括 default、primary、success、info、warning、danger
label 标签:通过 label 标签可以为文字添加背景色
{% label [class]@text %}- 支持的 class 种类包括 default、primary、success、info、warning、danger
button 按钮:通过 button 标签可以快速添加带有主题样式的按钮
{% button /path/to/url/, text, icon [class], title %}
{% btn /path/to/url/, text, icon [class], title %}
tab 标签:tab 标签用于快速创建 tab 选项卡
{% tabs [Unique name], [index] %} <!-- tab [Tab caption]@[icon] --> 标签页内容(支持行内标签) <!-- endtab --> {% endtabs %}- Unique name: 全局唯一的 Tab 名称,将作为各个标签页的 id 属性前缀
- index: 当前激活的标签页索引,如果未定义则默认选中显示第一个标签页,如果设为 - 1 则默认隐藏所有标签页
- Tab caption: 当前标签页的标题,如果不指定则会以 Unique name 加上索引作为标题
- icon: 在标签页标题中添加 Font awesome 图标
引用站内链接
{% post_path slug %} {% post_link slug [title] %}slug表示_post目录下的 Markdown 文件名。- post_path 标签将会渲染为文章的地址,即 permalink;而 post_link 标签将会渲染为链接,可以通过 title 指定链接标题。
插入 Swig 代码:通过 raw 标签来禁止 Markdown 引擎渲染标签内的内容。该标签通常用于在页面内引入三方脚本实现特殊功能。
{% raw %}
content
{% endraw %}
插入 Gist
{% gist gist_id [filename] %}- gist_id: Gist 仓库页面 url 中最后一段随机字符串
- filename: Gist 中的文件名,如果 Gist 中只有一个文件,可以不用指定 filename,如果 Gist 中有多个文件,可以在标签内输入 filename 来指定只引入某个文件,如果没有指定 filename,将会引入 Gist 中的所有文件。
插入图片:
Markdown 并不会保存插入的图片资源本身,只是记录了获取资源的链接。
相对路径引用的标签插件
{% asset_img slug [title] %}slug 是资源文件夹下的图片名
Embedding an image using markdown:allows you to embed an image in markdown without using asset_img tag plugin.
post_asset_folder: true marked: prependRoot: true postAsset: truewill be rendered as<img src="/2020/01/02/foo/image.jpg">.
思路是在
before_post_render阶段将markdown文件中图片的路径转换为asset_img函数。npm install hexo-image-link --save
Install
npm install --save hexo-blog-encryptQuick start: Add the “password” value to your post’s front matter like
---
password: mikemessi
---
在 Hexo 目录下的 scripts 目录中创建一个 JavaScript 脚本文件。通过这个脚本,我们用其来监听
hexo new这个动作,并在检测到hexo new之后,执行编辑器打开的命令。将下列内容写入你的脚本
var spawn = require('child_process').exec;

hexo.on('new', function(data){
  spawn('start  "markdown编辑器绝对路径.exe" ' + data.path);
});
文章置顶
---
sticky: true
---
资源文件夹
资源(Asset)代表 source 文件夹中除了文章以外的所有文件。
文章资源文件夹
post_asset_folder: true
当资源文件管理功能打开后,Hexo将会在你每一次通过 hexo new [layout] <title> 命令创建新文章时自动创建一个文件夹。这个资源文件夹将会有与这个文章文件一样的名字。将所有与你的文章有关的资源放在这个关联文件夹中之后,你可以通过相对路径来引用它们。
部署
持续集成(Continuous Integration,简称 CI)
Simply Push to Deploy:热部署,只需要将代码 push 到 Git 远程仓库即可自动构建及更新。
Add your ssh key pair
Run the following terminal command, replacing the email with one connected to your GitHub account.
ssh-keygen -t rsa -C "[email protected]"Windows 下自定义 ssh key 文件需写成
GIT\BlogSrc/.ssh/id_rsaIn Github Pages repo: Add the contents of the public key(id_rsa.pub) within your repositories deploy keys menu. You can find this option by going to
Settings > Deploy Keys, you can name the public key whatever you want, but you do need to give it write access.In hexo source code repo: Add the contents of the private key(id_rsa) to the
Settings > Secretsmenu asDEPLOY_KEY.
Configure github workflows:Create a workflow .yml file in your .github/workflows directory.
name: Deploy

on: [push]

jobs:
  build:
    runs-on: ubuntu-latest
    name: A job to deploy blog.
    steps:
    - name: Checkout
      uses: actions/checkout@v1
      with:
        submodules: true # Checkout private submodules(themes or something else).

    # Caching dependencies to speed up workflows. (GitHub will remove any cache entries that have not been accessed in over 7 days.)
    - name: Cache node modules
      uses: actions/cache@v1
      id: cache
      with:
        path: node_modules
        key: ${{ runner.os }}-node-${{ hashFiles('**/package-lock.json') }}
        restore-keys: |
          ${{ runner.os }}-node-
    - name: Install Dependencies
      if: steps.cache.outputs.cache-hit != 'true'
      run: npm ci

    # Deploy hexo blog website.
    - name: Deploy
      id: deploy
      uses: sma11black/[email protected]
      with:
        deploy_key: ${{ secrets.DEPLOY_KEY }}
        user_name: your github username  # (or delete this input setting to use bot account)
        user_email: your github useremail  # (or delete this input setting to use bot account)
        commit_msg: ${{ github.event.head_commit.message }}  # (or delete this input setting to use hexo default settings)
    # Use the output from the `deploy` step(use for test action)
    - name: Get the output
      run: |
        echo "${{ steps.deploy.outputs.notify }}"
一键部署
新建一个空的 repository(没有init任何内容)。你的 repository 必须直接命名为
<你的 GitHub 用户名.github.io>。从而能通过<你的 GitHub 用户名.github.io>域名直接访问你的blog。安装 hexo-deployer-git。
npm install hexo-deployer-git --save修改
_config.yml配置。deploy: type: git repo: [email protected]:yourname/yourname.github.io.git branch: master生成站点文件并推送至远程库。执行
hexo clean&hexo deploy。登入 Github,在库设置(Repository Settings)中将默认分支设置为
_config.yml配置中的分支名称。稍等片刻(Blog 不会立马加载出来,需多刷新几下),您的站点就会显示在您的Github Pages中。这是如何发生的:当执行
hexo deploy时,Hexo 会将public目录中的文件和目录推送至_config.yml中指定的远端仓库和分支中,并且完全覆盖该分支下的已有内容。部署分支与写作分支:
hexo d部署到 GitHub 的是 hexo 编译后的文件,不包含源文件。可以利用git的分支管理,将源文件上传到 GitHub。一个好的实践是放在两个不同的 Git 仓库中。
主题
创建 Hexo 主题非常容易,您只要在 themes 文件夹内,新增一个任意名称的文件夹,并修改 _config.yml 内的 theme 设定,即可切换主题。
_config.yml:主题的配置文件。和 Hexo 配置文件不同,主题配置文件修改时会自动更新,无需重启 Hexo Server。languages:语言文件夹。layout:布局文件夹。scripts:脚本文件夹。source:资源文件夹。
在 GitHub 搜索 Hexo 即可找到流行的 Hexo 主题。各主题都有相应的使用文档。
其他
列表之后不能立即接一个代码块,否则会解析出错。如
- ```bash
  code...
  ```
一行代码没有问题
- `code`
首页展示最新博客
index_generator:
  path: ''
  per_page: 10
-  order_by: -date
+  order_by: {updated: -1}

-updated_option: 'mtime'
+updated_option: 'date'
Api Document:https://hexojs.github.io/warehouse/Query.html#sort
sort(orderby, orderopt) → {Query}Example:
query.sort('date', -1);
query.sort({date: -1, title: 1});
query.sort('-date title');
If the
orderequals to-1,descordescending, the data will be returned in reversed order.Parameters:
Name Type Attributes orderbyStringObjectorderStringNumber
Sortis to sort the object properties (Page-Variables), refer to the above document for details。Variable Description Type page.titleArticle title stringpage.dateArticle created date Moment.js object page.updatedArticle last updated date Moment.js object const posts = locals.posts.sort(config.index_generator.order_by);updated_option控制了当 Front Matter 中没有指定updated时,updated如何取值:mtime: 使用文件的最后修改时间。这是从 Hexo 3.0.0 开始的默认行为。date: 使用date作为updated的值。可被用于 Git 工作流之中,因为使用 Git 管理站点时,文件的最后修改日期常常会发生改变empty: 直接删除updated。使用这一选项可能会导致大部分主题和插件无法正常工作。
NexT
Getting Started
Installation
Installation
cd hexo-site
npm install hexo-theme-next
Usage, theme config file
theme: nextUpdate
cd hexo-site
npm update hexo-theme-next
Configuration
Installed through npm
cp node_modules/hexo-theme-next/_config.yml _config.next.yml
Theme Settings
Choosing Scheme:
By using Scheme NexT gives you different views. And nearly all config can be used by those Schemes.
# next/_config.yml
scheme: Muse
Configuring Favicon:
By default the Hexo site use NexT favicons in hexo-site/themes/next/source/images/ directory with different size for different device.
You can replace them with your own favicons.
For example, you can put your favicons in hexo-site/source/images/ directory. Then you need to rename them and change the settings in favicon section in theme config file.
Creative Commons:
NexT supports the display of Creative Commons 4.0 International License in sidebar and post.
# next/_config.yml
creative_commons:
  license: by-nc-sa
  sidebar: true
  post: false
  language: en
通行的版权协议是一种限制性的协议,就是说,只有它明文许可你可以做的事,你才能做,否则就是侵权行为。
而"开放内容许可证"(open content licenses)只明文禁止使用者不能做的事,除此以外,可以随意使用这些作品。创作共用许可证(Creative Commons licenses,简称cc),就是这样一种许可证。
使用创作共用许可证,作者可以选择保留四种权利:
- 署名(Attribution,简写为by):必须提到原作者。
- 非商业用途(Noncommercial,简写为nc):不得用于盈利性目的。
- 禁止演绎(No Derivative Works,简写为nd):不得修改原作品。
- 相同方式共享(Share Alike,简写为sa):如果允许修改原作品,那么必须使用相同的许可证发布。
Configuring Menu Items:
Menu settings items have format Key: /link/ || icon which contains 3 values:
- Key → is the name of menu item (home, archives, etc.).
- /link/ → is the target link to relative url inside your site.
- icon → is the name of Font Awesome icon.
To customize menu items, edit the following content in theme config file
menu:
  home: / || fa fa-home
  about: /about/ || fa fa-user
  tags: /tags/ || fa fa-tags
  archives: /archives/ || fa fa-archive
schedule: /schedule/ || fa fa-calendar
sitemap:为了让博文被google或百度检索,需要使用hexo的sitemap功能。
sitemap: /sitemap.xml || fa fa-sitemap
Install
npm install hexo-generator-sitemap --saveHexo Config
sitemap:
  path: sitemap.xml
Except home and archives, all custom pages under menu section need to be created manually!
Sidebar Setting
Configuring Avatar:
Put your avatar under site directory source/uploads/ (create directory if it doesn’t exists).And then change option to url: /uploads/avatar.png.
avatar:
  url: /uploads/avatar.png
  rounded: true
点击头像回到首页:
主要是将<img class="site-author-image" ... />加入到<a href="/"></a>。
Sidebar Social Links:
Edit the
socialsection in theme config file as following:social: GitHub: https://github.com/yourname || fab fa-github E-Mail: mailto:[email protected] || fa fa-envelope取消社交图标前的小圆点:
# create hexo-site/source/_data/styles.styl
.links-of-author a,
.links-of-author .exturl {
  &:before {
    display: none;
  }
}
Sidebar Blogrolls (友链):
links:
  Title1: https://example.com/
Sidebar TOC:
toc:
  number: false
  expand_all: true
  max_depth: 5
Footer
Site Footer Icon:
By default NexT shows red heart icon between year and copyright information in the footer.
footer:
  icon:
    animated: true
Site Copyright Name:
By default NexT shows the name of author from site config file.
footer:
  copyright: YourName
Site Platform Information:
By default NexT shows Hexo and Theme & scheme information.
footer:
  powered: false
Site Beian Information:
Beian information is for Chinese users.
footer:
  beian:
    enable: true
    icp: 京ICP备 1234567890号-1
    gongan_id: 1234567890
    gongan_num: 京公网安备 1234567890号
    gongan_icon_url: /uploads/beian.png
Post Settings
Preamble Text:
You can use following ways to show summary of articles and a Read More button.
Use <!-- more --> in your article to break your article manually, which is recommended by Hexo. (recommended)
If you have added description and set its value to your article summary in front-matter, NexT excerpts description as preamble text in homepage by default. Without description, the full contents would be the preamble text in homepage.
Post Wordcount:
Installation
cd hexo-site
npm install hexo-word-counter
hexo clean
Hexo Config
symbols_count_time:
  total_symbols: false	# By default NexT shows the number of all posts words in footer section.
  total_time: false		# By default NexT shows the estimated reading time of all posts in footer section.
Donate Settings:
Get your WeChat / Alipay receive money QRcode image(s) and put into
source/images.Set needed values in
theme config file:reward_settings: enable: true animation: false comment: Buy me a coffee reward: wechatpay: /images/wechatpay.png alipay: /images/alipay.png
Follow Me:
follow_me:
  WeChat: /images/wechat_channel.jpg || fab fa-weixin
  RSS: /atom.xml || fa fa-rss
- 安装RSS插件
npm i hexo-generator-feed
- 配置站点配置文件(/_config.yml)的Extensions
plugin:
- hexo-generator-feed
# Feed Atom
feed:
  type: atom
  path: atom.xml
  limit: 20
- 编辑主题配置文件(/theme/next/_config.yml)的
social links,开启RSS的页面功能
rss: /atom.xml
- 关注RSS:把
https://vanehsiung.github.io/atom.xml复制到RSS阅读器上,就能关注了。
Custom Pages
Custom Page Support:
Adding New Page
cd hexo-site
hexo new page tags
Setting Front-matter Values
---
title: Tags
date: title: 2020-11-14 22:50:2
type: "tags"
---
Editting Menu
menu:
  tags: /tags/ || fa fa-tags
Custom 404 Page:
Create a new page called 404
cd hexo-site
hexo new page 404
---
title: 404
permalink: /404.html		# 在 Github Docs 中 Github Pages 章有写
comments: false
---
Make sure relative_link is disabled in site config file
relative_link: falseWhether users can be redirected to the 404 page depends on the settings of the website hosting service or web server, not Hexo.
Misc Theme Settings
Mobile Devices Adaptation:
reduce padding/margin indents on devices with narrow width
mobile_layout_economy: true
Codeblock Style:
NexT uses the Highlight.js and Prism package to support code highlight
Read Hexo’s documentation on Syntax Highlighting first, and set it up in site config file(在
_config.yml中开启 Highlight 或 Prism)highlight: enable: truePreview all available Code Highlight themes here: NexT Highlight Theme Preview
Change the value of theme and prism to choose the highlight style you like
theme:
  light: xcode
NexT supports the copy-and-paste functionality of codeblock
codeblock:
  copy_button:
    enable: true
    style: mac		# Mac Panel风格代码块
Back To Top:
back2top:
  scrollpercent: true
Fonts Customization:
font:
  enable: true

  host: https://fonts.loli.net

  global:
    family: Architects Daughter, Ma Shan Zheng

  codes:
    family: Share Tech Mono
host:查看字体与使用字体的网址是不一样的;可能不能查看字体,但可以使用字体
查看 Google Fonts,使用 Google Fonts
https://fonts.googleapis.com,以下为镜像https://fonts.loli.nethttps://fonts.googleapis.cnpmjs.orghttps://fonts.proxy.ustclug.org
查看谷歌字体中文版,使用
https://fonts.font.im技巧:先放 latin 文字,再放 chinese 文字,就可以分别定制英文与中文(有些中文字体包含英文字母)。手机无法显示自定义的中文字体,但可以显示自定义的英文字体。
SEO
SEO Setting:
Next provides useful options for better Search Engine Optimization (SEO).
By default a canonical link tag is created in Hexo after you have set up your URL url: http://example.com in site config file.
# theme config file
disable_baidu_transformation: true
index_with_subtitle: true
exturl: true
Webmaster Tools:
Google Webmaster Tools
Login to Google Webmaster Tools and go to verification methods and choose
HTML Tag, you will get some code:<meta name="google-site-verification" content="XXXXXXXXXXXXXXXXXXXXXXX">Copy
XXXXXXXXXXXXXXXXXXXXXXXvalue ofcontentkey.Edit theme config file and add or changegoogle_site_verificationsection:google_site_verification: XXXXXXXXXXXXXXXXXXXXXXXsubmit sitemap
That the new console says ‘couldnt fetch’ is a bug in the console. Pending is the real status!
Bing Webmaster Tools
Login to Bing Webmaster Tools and go to verification methods and choose
HTML Tag, you will get some code:<meta name="msvalidate.01" content="XXXXXXXXXXXXXXXXXXXXXXX">Copy
XXXXXXXXXXXXXXXXXXXXXXXvalue ofcontentkey. Edit theme config file and add or changebing_site_verificationsection:bing_site_verification: XXXXXXXXXXXXXXXXXXXXXXXsubmit sitemap
Bing 收录最快,立马就可以看到
Baidu Webmaster Tools
Login to Baidu Webmaster Tools and go to verification methods and choose
HTML Tag, you will get some code:<meta name="baidu-site-verification" content="XXXXXXXXXXXXXXXXXXXXXXX">Copy
XXXXXXXXXXXXXXXXXXXXXXXvalue ofcontentkey.Edit theme config file and add or changebaidu_site_verificationsection:baidu_site_verification: XXXXXXXXXXXXXXXXXXXXXXXPush the url to baidu automatically
baidu_push: truesubmit sitemap
Third-party Services
Comment Systems
LiveRe (Korea):
Create an account or log into LiveRe, click on the
installationbutton and select the free city version, then click on theinstall nowbutton.Copy the
data-uidfield in the installation code to get your LiveRe UID.Add the obtained LiveRe UID to the
livere_uidsection in the theme config file as following:livere_uid:
Valine (China):
Create an account or log into LeanCloud, and then click on the bottom left corner to create the application in dashboard.
Go to the application you just created, select
Settings → App Keysin the lower left corner, and you will see your APP ID and APP Key.Edit configurations in
valinesection in the theme config file as following:valine: enable: true appId: appKey:评论数据管理:请自行登录
Leancloud应用管理。具体步骤:登录>选择你创建的应用>存储>选择ClassComment
Statistics and Analytics
Analytics Tools:
Baidu Analytics (China)
Login to Baidu Analytics and locate to site code getting page.
Copy the script ID after
hm.js?.Edit theme config file and change section
baidu_analyticsto your script ID.baidu_analytics:
Google Analytics
Create an account and log into Google Analytics.
Edit theme config file and fill
tracking_idunder sectiongoogle_analyticswith your Google track ID. Google track ID always starts withUA-(最新版 Google Analytics 是G-).google_analytics: tracking_id: G-XXXXXXXX only_pageview: false
Counting Tools:
Busuanzi Counting (China), Edit busuanzi_count option in theme config file.
不蒜子是基于域名来进行统计计算的。数据比百度统计多很多。网络不好的话,数据与图标不一定显示得出来。
busuanzi_count:
  enable: true
Search Services
Local Search:
This search method is recommended for most users.
Installation
npm install hexo-generator-searchdbHexo Config
search:
  path: search.xml
  field: post
  content: true
  format: html
NexT Config
local_search:
  enable: true
External Libraries
PJAX:
You can enable it by setting value
pjaxtotrueintheme config file.pjax: trueIt listens to every click on links you want (by default all of them).When an internal link is clicked, Pjax fetches the page’s HTML via AJAX.
Please use the absolute path of the image or Hexo asset_img tag in your posts, otherwise the images may fail to load during Pjax refresh.
例子:添加音乐播放器并保持跳转时不中断播放状态;fireworks 特效更流畅,不存在点击链接时的卡顿现象(点击链接时不会触发fireworks)。
Fancybox:
A jQuery lightbox script for displaying images, videos and more.
fancybox: true
It delays loading of images in long web pages. Images outside of viewport will not be loaded before user scrolls to them.
lazyload: true
Progress Bar:
NProgress will automatically monitor your Ajax requests, event loop lag, document ready state and elements on your page to decide on the progress.
nprogress:
  enable: true
  spinner: false
Canvas Ribbon:
canvas_ribbon:
  enable: true
  size: 300			# The width of the ribbon.
  alpha: 0.6		# The transparency of the ribbon.
  zIndex: -1		# The display level of the ribbon.
粒子漂浮聚合:
该功能由 theme-next-canvas-nest 插件提供:
Create a file named
footer.njkinhexo/source/_datadirectory, Edit this file and add the following content<script color="0,0,255" opacity="0.5" zIndex="-1" count="99" src="https://cdn.jsdelivr.net/npm/canvas-nest.js@1/dist/canvas-nest.js"></script>In the NexT
_config.yml, uncommentfooterunder thecustom_file_pathsection.custom_file_path: footer: source/_data/footer.njk
Tag Plugins
Settings
mermaid:
  enable: true
Usage
{% mermaid type %}
{% endmermaid %}
Advanced Settings
Custom Files
uncomment under the section in
theme config file.stylecustom_file_path。custom_file_path: head: source/_data/head.njk header: source/_data/header.njk ...Edit in site root directory and add files:
source/_data/...。Then use it。
Stylus 是 CSS 的预处理框架,给 CSS 添加了可编程的特性。Stylus支持三种注释,单行注释(
//),多行注释(/* */)。Nunjucks 是 jinja2 的 javascript 的实现,可以使用
{#and#}来写注释,渲染时将会去除所有的注释。不要直接修改 model 文件,而要使用 custom file,方便之后升级。
Front Matter
---
photos: /uploads/png.png
---
Misc Settings
想要什么功能可以搜一下,看是否有现成的 model 可以使用。
网易云音乐
- 在网页版云音乐中找到歌曲,点击生成外链播放器
- 根据个人喜好选择播放器尺寸和播放模式
- 将获取到的 iframe 代码添加到页面中
Aplayer 音频播放器
借助 hexo-tag-aplayer 插件,可以通过标签的形式方便快捷的插入音频组件。
Installation
npm install --save hexo-tag-aplayerUsage
{% aplayer "title" "author" "url" ["picture_url", "narrow", "autoplay", "width:xxx", "lrc:xxx"] %}- title: 曲目标题
- author: 曲目作者
- url: 音乐文件 URL 地址
- picture_url: (可选) 音乐对应的图片地址
- narrow: (可选)播放器袖珍风格
- autoplay: (可选) 自动播放,移动端浏览器暂时不支持此功能
- width:xxx: (可选) 播放器宽度 (默认: 100%)
- lrc:xxx: (可选)歌词文件 URL 地址
当开启 Hexo 的 文章资源文件夹功能时,可直接引用
{% aplayer "Caffeine" "Jeff Williams" "caffeine.mp3" "picture.jpg" "lrc:caffeine.txt" %}
Dpalyer 视频播放器
npm install hexo-tag-dplayer --saveUsage
{% dplayer "url=video-url" "pic=image-url" ... ["key=value"] %}部分重要 key
- 播放器
- autoplay:是否开启视频自动播放,默认为
fasle - loop:是否开启视频循环播放,默认为
false - screenshot:是否开启截图,默认为
false - mutex:是否禁止多个播放器同时播放,默认为
true - dmunlimited:是否开启海量弹幕模式,默认为
false - preload:预加载模式,可选
notemetadataauto - theme:主题色
- lang:语言,可选
enzh-cnzh-tw - logo:左上角的 Logo
- volume:默认音量,默认为 0.7
- width:播放器宽度
- height:播放器长度
- autoplay:是否开启视频自动播放,默认为
- 视频
- url:视频链接
- pic:视频封面
- thumbnails:视频缩略图,可以使用 DPlayer-thumbnails 生成
- vidtype:视频类型,可选
autohlsflvdash或其他自定义类型
- 字幕
- suburl:字幕链接
- subtype:字幕类型,可选
webvttass,目前只支持webvtt - subbottom:字幕距离播放器底部的距离,如
10px10% - subcolor:字幕颜色
- 弹幕
- id:弹幕 id
- api:弹幕 api
- token:弹幕后端验证 token
- addition:额外外挂弹幕
- dmuser:弹幕用户名
- maximum:弹幕最大数量
- 播放器
看板娘
该功能由 hexo-helper-live2d 插件支持
Installation
npm install --save hexo-helper-live2dConfig:在站点配置文件中设置,主题配置文件中设置没用
live2d:
  enable: true
  scriptFrom: local
  pluginRootPath: live2dw/
  pluginJsPath: lib/
  pluginModelPath: assets/
  tagMode: false
  log: false
  model:
    use: live2d-widget-model-shizuku
  display:
    position: right
    width: 150
    height: 300
  mobile:
    show: true
  react:
    opacity: 0.7
Models:可以从 hexo live2d 模型预览 里找到你喜欢的角色,然后根据 live2d-widget-models 中提供的方法来下载模型数据.
npm install live2d-widget-model-shizuku
一个鼠标点击动画特效
npm install next-theme/hexo-next-fireworks
一个为博客添加酷炫打字特效的插件
编辑
/hexo-site/source/_data/footer.njk<script src="https://cdn.jsdelivr.net/gh/suyin-long/[email protected]/dist/activate-power-mode.js"></script> <script> POWERMODE.colorful = true; // make power mode colorful POWERMODE.shake = false; // turn off shake document.body.addEventListener('input', POWERMODE); </script>取消
footer: source/_data/footer.njk的注释
搞怪网页标题
编辑
/hexo-site/source/_data/head.njk,添加{# 搞怪网页标题 #} {% if theme.title_trick.enable %} <script> var OriginTitile = document.title; var titleTime; document.addEventListener("visibilitychange", function() { if (document.hidden) { document.title = "{{ theme.title_trick.leave }}"; clearTimeout(titleTime); } else { document.title = "{{ theme.title_trick.enter }}"; titleTime = setTimeout(function() { document.title = OriginTitile; }, 2000); } }); </script> {% endif %}在主题配置文件中添加
# a trick on website title
title_trick:
  enable: true
  leave: "(つェ⊂)我藏好了哦~"
  enter: "(*´∇`*) 被你发现啦~"
我先是放在
sorce/_data/head.njk中,问题是改变一次标题后就只显示网址。我认为 script 可能在<title>之前加载,所以就放在source/_data/header.njk,正常运行。
Install
npm install next-theme/hexo-next-threeConfigure
# JavaScript 3D library.
# Dependencies: https://github.com/next-theme/hexo-next-three
three:
  enable: true
  defer: true
  cdn:
  waves:
    enable: false
    cdn:
  lines:
    enable: false
    cdn:
  sphere:
    enable: false
    cdn:
How to use
npm install hexo-cake-moon-menuConfig: In hexo
_config.ymlmoon_menu: back2top: enable: true icon: fas fa-chevron-up func: back2top order: -1 back2bottom: enable: true icon: fas fa-chevron-down func: back2bottom order: -2
permalink
默认的文章 url 地址为
http://yoursite.com/:year/:month/:day/:title/,这种 url 格式层级太多,并且如果文章标题是中文的话可能会发生转义而出现一堆乱码,不利于搜索引擎的爬取分析,因此建议在站点配置中修改permalink的格式来简化页面 url,并尽量采用英文命名 Markdown 文件。(这个根据个人选择,我认为有更有组织的文件结构更重要)这个 front matter 必须是 html 文件,文件会生成到 public 根目录。
 ---
 permalink: /post-name.html
 ---
robots.txt
robots.txt(统一小写)是一种存放于网站根目录下的ASCII编码的文本文件,它通常告诉网络搜索引擎的漫游器(又称网络蜘蛛),此网站中的哪些内容是不应被搜索引擎的漫游器获取的,哪些是可以被漫游器获取的。
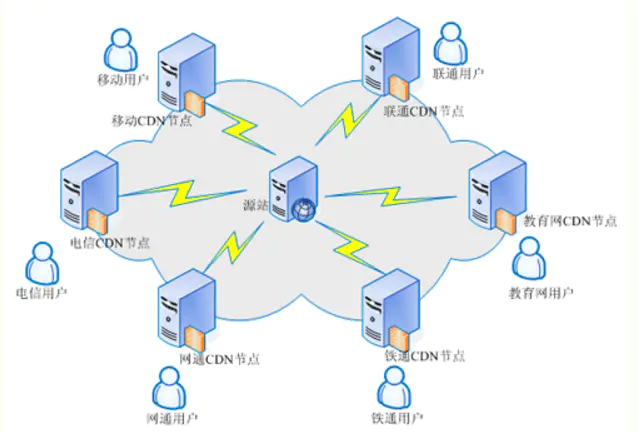
CDN
CDN 的全称是(Content Delivery Network),即内容分发网络。其目的是通过在现有的 Internet 中增加一层新的CACHE(缓存)层,将网站的内容发布到最接近用户的网络“边缘”的节点,使用户可以就近取得所需的内容,提高用户访问网站的响应速度。从技术上全面解决由于网络带宽小、用户访问量大、网点分布不均等原因,提高用户访问网站的响应速度。
CDN 工作原理
传统访问过程:
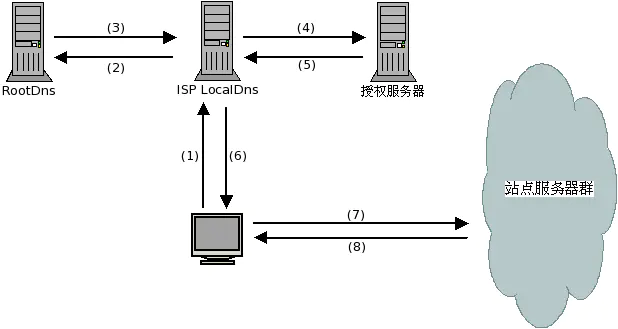
- 用户输入访问的域名,操作系统向 LocalDns 查询域名的ip地址
- LocalDns 向 ROOT DNS 查询域名的授权服务器(这里假设LocalDns缓存过期)
- ROOT DNS 将域名授权 dns 记录回应给 LocalDns
- LocalDns 得到域名的授权 dns 记录后,继续向域名授权 dns 查询域名的 ip 地址
- 域名授权 dns 查询域名记录后,回应给 LocalDns
- LocalDns 将得到的域名 ip 地址,回应给用户端
- 用户得到域名 ip 地址后,访问站点服务器
- 站点服务器应答请求,将内容返回给客户端
CDN 访问过程:
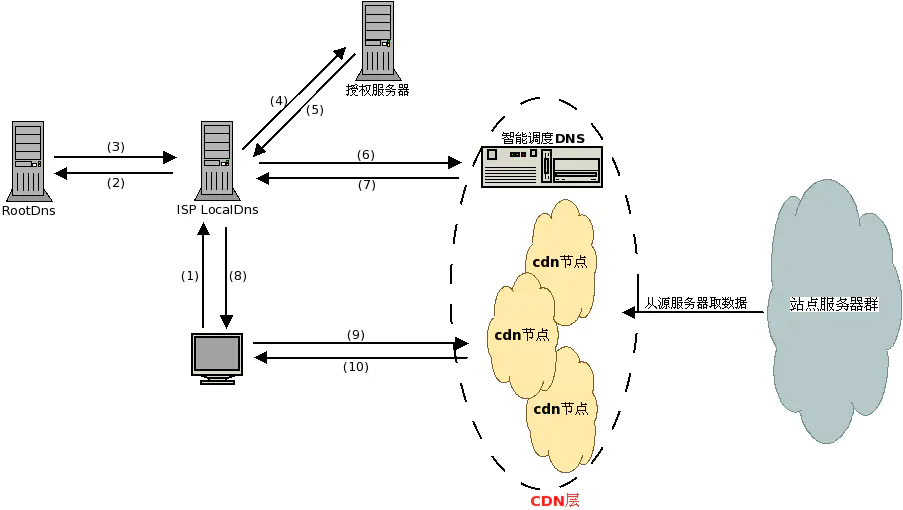
- 用户输入访问的域名,操作系统向 LocalDns 查询域名的 ip 地址
- LocalDns 向 ROOT DNS 查询域名的授权服务器(这里假设LocalDns缓存过期)
- ROOT DNS 将域名授权 dns 记录回应给 LocalDns
- LocalDns 得到域名的授权 dns 记录后,继续向域名授权 dns 查询域名的 ip 地址
- 域名授权 dns 查询域名记录后(一般是CNAME),回应给 LocalDns
- LocalDns 得到域名记录后,向智能调度 DNS 查询域名的 ip 地址
- 智能调度 DNS 根据一定的算法和策略,将最适合的 CDN 节点 ip 地址回应给 LocalDns
- LocalDns 将得到的域名 ip 地址,回应给用户端
- 用户得到域名 ip 地址后,访问站点服务器
- CDN 节点服务器应答请求,将内容返回给客户端
参考
NPM
npm makes it easy for JavaScript developers to share and reuse code, and it makes it easy to update the code that you’re sharing.
基本:
package.json 和 package-lock.json
- package.json 执行 npm init 命令生成,描述项目模块信息
- package-lock.json 执行 npm install 命令生成,描述模块来源及依赖信息,可删除
安装模块:
全局安装
npm install -g 模块名称本地安装:读取 package.json 并下载模块到
node_modules的目录,模块分为两类 dependencies 和devDependencies,分别对应生产环境需要的安装包和开发环境需要的安装包npm install <package_name> # 在安装模块的时候,可以通过指定参数来修改 package.json 文件 npm install <package_name> --save npm install <package_name> --save-dev
更新模块
npm update卸载模块
npm uninstall -g <package_name>
npm uninstall <package_name>

# 卸载模块的同时,也从 package.json 文件中移除
npm uninstall --save <package_name>
npm uninstall --save-dev <package_name>
解决问题:
Ubuntu 安装最新 LTS 版本:官方教程,Windows 版本更好
sudo mkdir -p /usr/local/lib/nodejs
sudo tar -xJvf node-$VERSION-$DISTRO.tar.xz -C /usr/local/lib/nodejs
vi ~/.profile
# Nodejs
VERSION=v10.15.0
DISTRO=linux-x64
export PATH=/usr/local/lib/nodejs/node-$VERSION-$DISTRO/bin:$PATH
. ~/.profile		# Refresh profile
sudo ln -s /usr/local/lib/nodejs/node-$VERSION-$DISTRO/bin/node  /usr/bin/node
查看 npm 配置
npm config list -l
npm config ls
配置镜像:淘宝镜像不好用,特对对于 update
npm config set registry https://registry.npmjs.org --global配置 NPM 不做严格的 SSL 校验
npm config set strict-ssl falsenpm ERR! Unexpected end of JSON input while parsing near …
npm cache clean --forcenpm WARN notsup SKIPPING OPTIONAL DEPENDENCY: Unsupported platform for fsevents:不管
npm ERR! code EINTEGRITY
grep -ir "sha1-WYr+VHVbKGilMw0q/51Ou1Mgm2U" ~/.npm		# wanted sha1
npm cache clean --force
grep -ir "sha1-WYr+VHVbKGilMw0q/51Ou1Mgm2U" ~/.npm
npm install
getaddrinfo EAI_AGAIN registry.npmjs.org:网络问题,重新运行
npm install升级为最新稳定版本的 node.js:超慢
sudo npm cache clean -f
sudo npm install -g n		# n 是 Node版本管理控制器
sudo n stable
Great Blogs
yearito ,suyin ,yleao ,dlzhang
Version
| Name | Version |
|---|---|
| npm | 7.0.8 |
| hexo | 5.2.0 |
| hexo-theme-next | 8.0.2 |